Thursday 28 July 2016

Gluten free BlueBerryPie

I love blueberries. The taste. The shade. So yummy in many ways. These are fresh wilderness blueberries. It is time for my own gluten free BlueBerryPie!

This is not paid advertisement or anything. I just happened to notice Creme Bonjour's new butter & olive oil margarine worked great with my own recipe! Perhaps it was this olive oil included and the dough was a bit of something else than a sticky goo. I had nothing else in my fridge and I am happy I tested this out on gluten free baking.

Base

Mix well together by electric mixer
200 g margarine
2 dl sugar

Keep on mixing well and add
2 eggs
5 dl gluten free flour mix (I use Semper FinMix)
2 table spoons baking powder

Spread the dough into a baking tray (approx 40 x 28 cm) covered by baking paper

Filling

Sprinkle 3 dl blueberries over the dough

Mix well by elecric mixer. Just so that it really is mixed up.
2 eggs
1 dl sugar

Add and mix well
400 g sour cream

Pour over the dough & blueberries and spread around well


Cook in 200 Celsius degrees / approx 30 minutes.


Wednesday 27 July 2016

Rosy's Visitors

One more card was needed. This time I picked up Judy Hindley's book Rosy's Visitors illustrated by Helen Craig to create home made card. I bought this book from our local library where they had put it on sale to be removed from the collection. They always sell books they need to obviate for some reason. Children books are sold just buy 0,20€ and others with 1€.

Tuesday 26 July 2016

StarQuilt -tutorial (part3)

This is my own design for the final project of my StarQult patchwork massage table cover. This is also to where we aim here with the tutorial. If you are making a patchwork blanket just copy the pattern and make it to be as many blocks wide and long as needed. One square means one 5 x 5 cm block. Investigate the pattern to notice how the space between the star blocks have been created.

The smaller parts are for the head and arm part of my massage table but very suitable for pillow covers too.

You should now have finished your StarQuilt blocks according to the tutorial part2. Because the finished space between the StarQuilt blocks is always 5 cm it means you need 7 cm wide stripes including 1 cm seam allowance on both sides. Easiest way is to cut  7 cm stripes approximately as much as you need. No exact length is needed to be drawn here. I still use here old white sheets.

Also at this point you can sew like working on a conveyor belt. Just make sure the stripe's length is enough for one StarQuilt block.


Later on you just cut the stripe between the blocks.


At first sew the stripes between the StarQuilt blocks to create as wide line of them as needed.


Then when all the lines are ready connect them to each others. The seams are folded always towards the stripes -away from the StarQuilt blocks. I fold the seams by fingers after sewing each seam and iron only then when it all is finished.


Now, if you are making just an ordinary patchwork blanket or a cover for your massage table; in the 4th tutorial I will show you how to finish it all.

Monday 25 July 2016

Enjoying about the Summer

 
This year strawberries have been ridiculous expensive at the shops and market places. On the other day the price was 45,90€ / 5kg box! I boycott this kind of exploitation! No way I could pay that price. Especially because it is not even organic! I usually buy 20kg of strawberries on the market place but not any single kg on this year. The price I have before paid has been 16- 20 € / 5kg. The price has really exploded this year. They seem to have good reasons to lift up the price; also by creating hysterics about it how bad the crop has been. They complain about it every year.

This year we get satisfied only with our own strawberry harvest. The strawberry yield of MyOwnGarden is approximately 5kg. If it is a good year it could be more. I see no difference in my crop  this year compared to the previous. Some years I have got less strawberries from MyGarden than this year. My crop is just normal!

So, we are enjoying MyOwnGarden fresh strawberries on this summer and will just collect more other berries for the coming winter. In Finnish diet berries play big part what comes to get vitamins over the winter season.

As I told the weather has been excellent. We have washed some carpets and rugs. This is easy and cheap way of doing it in your garden. It demands a bit of power but He and MrW was there to help me out. According to the dirtiness let the carpets soak in the water at least half an hour; more if needed... few would be enough. Every now and then rub & scrape the carpet. For me it is easier to step over it and ask someone just to turn the carpet around at some point. I am too small and weak for another way of action. This stepping does just fine as long as you avoid accidents. My carpets had dog and cat vomit accidents. Seemed like they had a wild party night!!! No spot was left when this was done.

The rinse was done buy borrowed pressure washer. With that machine you need to be careful and watch out not to damage the carpets. Just the most sensitive mode, the one you can use for car washing, is enough. Garden hose is practical option too.

I have finally bought loom of my own. Thanks to my relatives because of that! I have washed all the parts now on my terrace in the sun. The loom is indoors now and waits to be built up!

It is weird how your hands remember things. It has been years since I worked with looms. At first it seemed out just a pile of wood. Suddenly it started to form out. At first my hands touched the parts and then my brains begun to get the picture. Without guide book I remembered which part was which and where it belonged to!

PS! Notice that despite I got my loom in pieces and bags I took them immediately out. In a very short time the wood surface begins to get mold spots because of the moisture caused by the temperature difference of the wood inside the bag and air outside the bag. These spots do no harm but look very untidy and ugly.

Sunday 24 July 2016

SwimmingFun

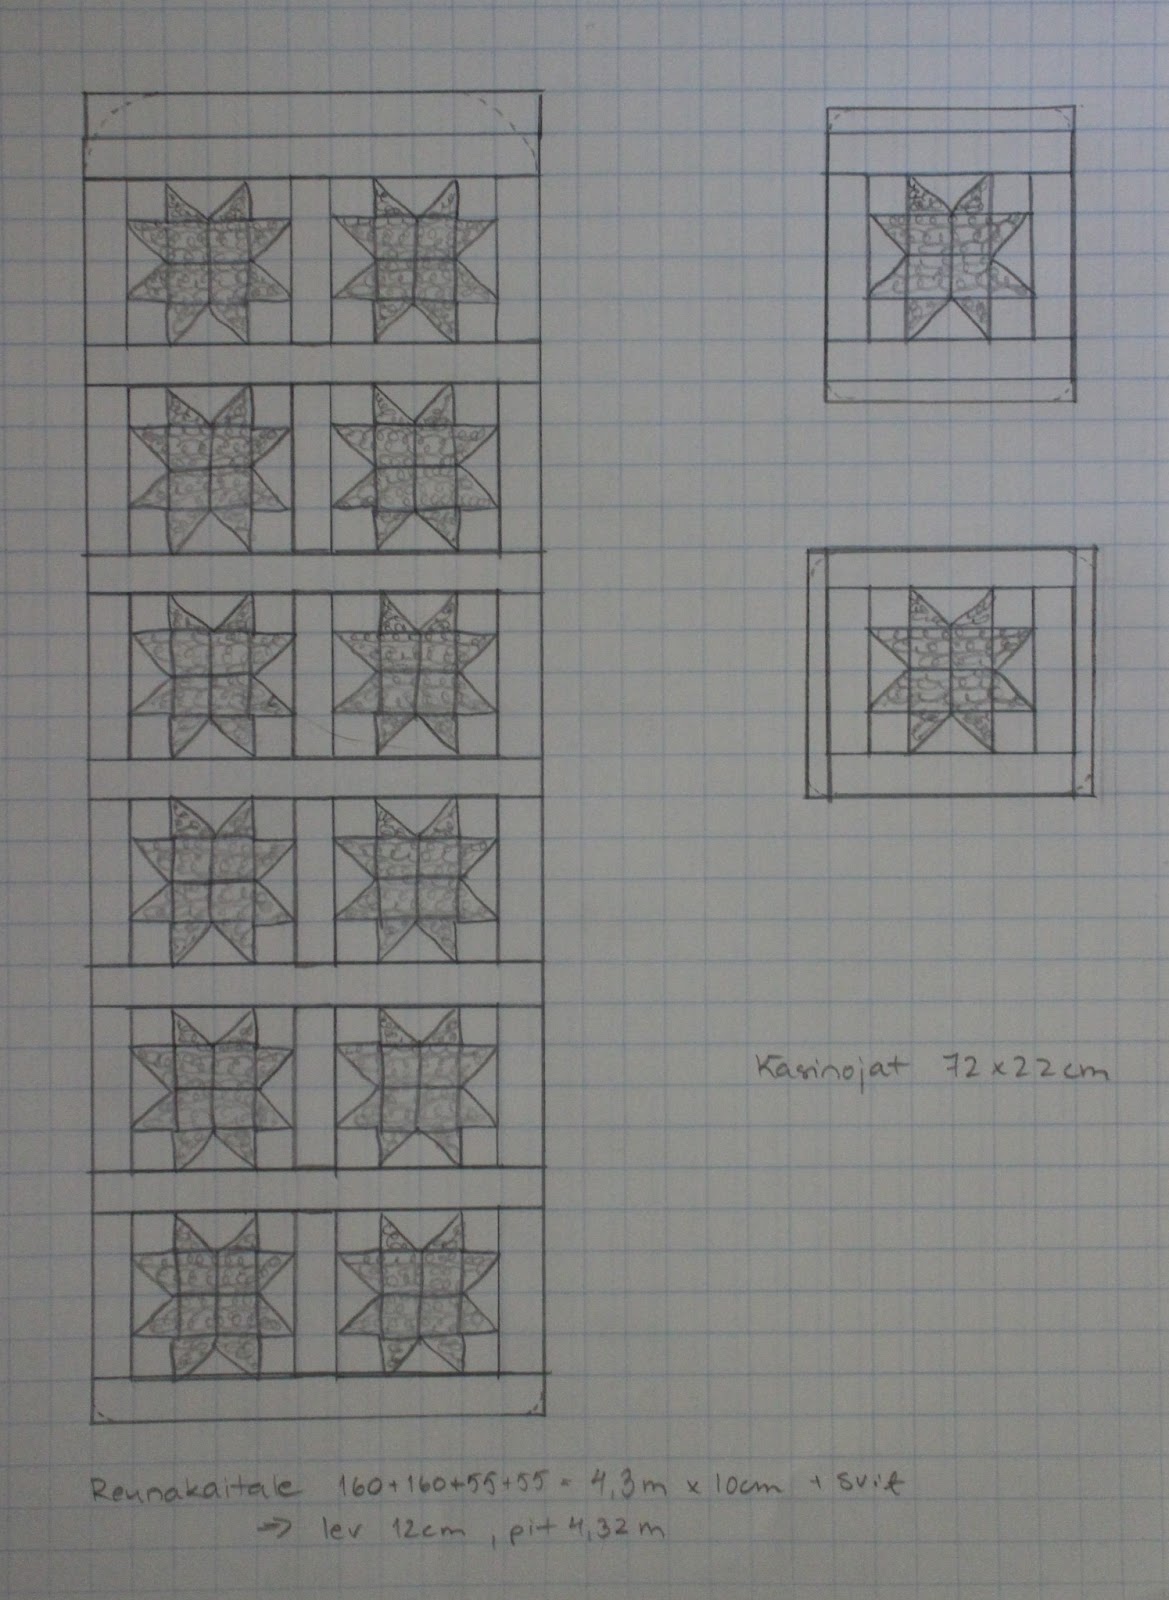
I still have not finished my StarQuilt blanket so you still need to wait for the tutorial part3. I do have all my needed Stars but they are still waiting for me in a tidy pile to be put up all together. Well, I do have a good excuse you for sure can accept. It is the heat weave which crashed at SeaLapland. It has been far to hot to do anything but swim and lay in my hammock. By the arctic circle it is rare to wake up on several mornings with the temperature +20 Celsius degrees in the shadow! Not to mention how high (+24) it rises during the day. Not to mention my sunny terrace and its +40 degrees! No,I am not complaining... just enjoying. :)

So, for all dog lovers and owners I decided to blog a bit about dog training. You know Nuka arrived last December. She was just about 10 months old. She had some problems with the water. Especially when it all started to melt. She had her lesson and stopped to play fool with this dangerous element.

But she must get familiar with the water. She is going to be a hunting dog. Ability to understand this element, swim in it and accept the wet water feeling not to mention about getting familiar with its influences and impacts can save her life in the wilderness. That is the main reason for her summer education with the water. Swimming makes good also for the muscles and joints so it is useful exercising format also for the dogs.

All my dogs have been good swimmers. Even the rescue dogs I've got after their puppy years. Not to mention about the dogs I've been looking after during their owners' holidays despite the owners told their dog hate to swim. Granny didn't like to dive. She didn't love the water. It made her to be worried. She'd rather be elsewhere. Because of her traumas her education took few years but she did learn to trust us despite she didn't trust in the water; never. I don't know what had happen to her but I for sure can only image.

But how I make the dogs to swim? I don't do the things you see to be done, hear to be told to do or guided to do.

I NEVER throw them into the water from wharf, platform, shore, rock or anything. NEVER.

I NEVER carry them in my arms into the water and release in the depths they must swim back to the shore. NEVER.

I NEVER pull or push them into the water. Not into the smallest pond, ditch or brook where would be only half inch of water. NEVER.

I simply NEVER do anything to feel they are forced and demanded. I neither regulate their access into or by the water; meaning also that water bowl by which my kids or animals would make a huge mess. NEVER.

 My dogs need to be able to swim. If your dog needs that skill too, start immediately. When the dog is still a tiny puppy it is easier because its own will is still smaller than yours. Being a puppy is a false excuse to avoid swimming education.

Instead of forcing I start with these lesson immediately when the dog arrives:

Free access to the water. ALWAYS. No matter how wet, messy or dirty it would get.

Daily walks mean also walking in the pouring rain and thunder storms. ALWAYS. Bad weather is not excuse. It is a good moment to teach the dog how the water feels and what it causes. If the dog doesn't want to go out in the rain, then I gently force it outside. The dog forgets soon its unwillingness for the wet walk when it notices everything smells and seems different when it is wet. Old bath towel can dry up a big dog after the walk. Just remember to brush by it also the armpits and stomach. Especially the hind legs and each paw to avoid mess inside the house. The dog will soon learn to accept this drying.

When you start with deeper and bigger water remember:

Keep the dog in the leash. ALWAYS. It is then under your control. Rather use harness if the dog fears. Feeling something powerful around the neck may cause more fear despite it would have got used to it in the normal daily use.

Going into the water must be ALWAYS dogs own will. Simply ALWAYS. You can cheat as much as you desire but not force. As long as the dog thinks it is its own choice how deep it gets or how long it stays in everything will be fine. Go somewhere where the dogs are allowed (in Finland it means where their access is not limited) and the water doesn't get too deep too fast. If the dog doesn't want to go deeper or stay longer cheat by walking in the water along the shore direction. There you can slowly go deeper inch my inch.

ALWAYS keep the dog busy. Play, give treats, support etc. Don't leave it there with its own mind and fears. Playing in the water must feel natural. Don't let it fill its head with stubborn thinking or being afraid of.

So far Nuka has learnt to breath through her nostrils instead of mouth when carrying her VeryImportantBone. She has also learnt when not to breath at all. Because she now dares to put her nose into the water we have moved on to the next level.

She has just started to learn to dive. Well, she can decide somewhere in the future will she dive or not. Or does she need to dive or not at all. But she needs to learn to pick up things from the water. The things that don't float. Because of the hunting and surviving in the wilderness.

This task asks a lot of courage and character from the dog. But greater issue is the bond between you two. How great is the trust. Picking up items like this pic shows must ALWAYS be dogs own will.

In this case Nuka had found a piece of wood from the shore. She lost it because it didn't float so it was an excellent moment to teach her this. I just took the wood into the lower water than she lost the wood. It was then her own will, did she really want the wood or not. She decided she wanted it. We did this approx 5 times and then she was allowed to carry her treasure to home.

Notice that I didn't touch Nuka at all when learning this. Not even a single hair of her. I neither pulled the wood under the surface if she was holding it. I just showed her that the wood really was in the water and pointed the exact location of it by my hands. In teaching this you need to be extremely fair and remember not to break the trust. Start with easy task and stay on easy level for a long time.


Wednesday 20 July 2016

StarQuilt -tutorial (part2)

So, you should have made your pattern and cut the fabric by now according to the StarQuilt -tutorial (part1)?

This is what we aim to.

Sew first the central square blocks. You can sew it all in a line. Meaning just don't cut the thread when moving on to the next blocks. Just reverse few stitches on the begin and at the end of each seam to secure the seam and then feed in the next blocks.

You can work in this way with each seam. It is like working by conveyor belt in mass production. It eases your job a lot. It also makes it a bit faster.

After the first seams I do my first ironing unless the fabric is impossible wrinkled to cope with drawing the patterns and cutting. Before ironing open the seams. Fingertips & nails are good for that. But if you have many seams to work with it may make your fingertips to be sore. A spoon is excellent "every house" tool for opening the seams and preparing them for ironing if you don't have any fancy sewing or patchwork equipment for this.

Open the seams from the back side and then flat them also on the front side if needed. Now the blocks are ready for ironing. When you do this preparing work you don't need to burn your fingers when ironing.

You need to also combine the triangles to be come squares again. When you have done that too; pile the blocks. See below the right folding direction for the triangle seam. It comes towards the star fabric.

We work in lines here. Connect the triangle square blocks to the central blocks like pictured above. Pay attention on it how to fold the seams! Notice you need to sew it all in the same way.  Later on you can turn half of these central line blocks upside down.

I recommend you to make the central lines first because then you avoid calculating. Which means you use just as many triangle square blocks as needed in the central parts. The remained ones are enough for the rest of the StarBlock. If you do it opposite it may be you connect too many cusps. At the end it really doesn't matter in which order you sew these four lines; especially if you have fewer StarBlocks and it is easier to keep up the calculating. But here I guide you to do it in the order "central block lines first".

So, now, connect the central lines together.

Here is how the seams should be folded.

Now, take the remaining triangle square blocks and arrange in the pictured way to make the sewing easier.

Sew the seam and fold it in the pictured way. Notice that again you need to sew them only in this way and turn half upside down later on.

Now connect the white square blocks in the pictured way. Again; fold the seams as pictured. Seams folded to the right direction makes it more tidy and eases your stitching later.

Then you just fasten the new block lines you just made on their places and fold the seams like this. It doesn't matter if there is mistake or two with folding every here and there. See mine on this block at right below corner.  These kind of errors are fine. Grander you need to fix.

Here it is; finished my own design StarQuilt block. In the next tutorial part I show how to connect the stars to become a quilt.

Tuesday 19 July 2016

StarQuilt -tutorial (part1)

Last autumn I had my early Christmas Gift. Since that it has been longing for proper cover. I planned two bigger projects for this summer. One was warming up my vintage fur coat. The other is this: to make pretty cover for my massage table as my own design.

Before -years ago- I made two decoration pillows by using patchwork method. The red shade fade away time ago but I saved the pillows as a sample. These pillows are my own design. I also did the pattern. But I had some difficulties for exact matching. I had done patchwork before but not this kind of. So, I saved them all for furter investigation to find out could I do it better.

I wanted to use simple patterns. Just two squares. Finished size for one square is 5 x 5 cm; and I keep it as a square or slice it to become a triangle. That means the pattern for 5 x 5 cm square needs to be 7 x 7 cm including 1 cm seam allowance. The square pattern for sliced square was 8 x 8 cm but I had some problems with it and needed to make smaller seam allowance to connect two triangles to be a square. I knew it was up to the mathematical counting. Dear MrW was very kind at early morning when he woke up and right with his dusty eyes he calculated and draw me better pattern. The size of the square which I aim to be sliced needs to be 8,4 x 8,4 cm; not 8 x 8. Thank you soooo much!

Here are the pattern and design. If you change the size of the squares see above MrW's pattern to count the needed size... If you have clever mathematical skills... In my design 1 square of the paper describes 1 cm. This kind of patterns are easy to design on squared paper.

Make the square patterns from thicker paper like cardboard paper. It is much easier and faster to drawn the patterns of the fabric if the pattern is thick. Easy way to get some hard pattern paper is just to look around. Many foods are packed in carton boxes despite they are placed in a plastic back before that.

Then you need to count how many StarQuilt blocks you need. I need 14 for my massage table cover. As well you can make just one normal quilt. It all happens in the same way. At the end I just will sew it all to the massage table cover form.

For the stars I will use old fabric which has dear history. Some people use brand new fabrics for patchwork. The others use old ones. Which ever is your choice remember to make sure you are using proper fabrics. If old ones are already weak; just don't pick up them. You will only cry your eyes out of your head when making a huge work only to find out the quilt begins to rupture.

Don't forget you can use old clothes too! Remember to use only clean materials. They also must be able to wash and iron.

I will use some white too. It is from old sheet. I always save old sheets. Meaning the ones that are in proper fit but so old that modern beds just are too big for them.

After picking up your fabrics you need to draw the patterns on the fabric. This method is for those who don't have all fancy quilting equipment. Just the old fashion method before everything fine and expensive was discovered.

You can iron the fabrics first or afterwards or how ever you prefer it.

As you saw I had only two square patterns; no triangle even I need ones. It is because I found it easier in this way. Later I just used pen and ruler to slice the 8,4 x 8,4 cm square.

When you have drawn enough squares cut them off. As you can see; I cut only squares. To keep them in better order and safe I will slice the needed pieces right before sewing. I don't trust in my animals that much that smaller parts would stand in piles and not to be spread around or get lost.

Next tutorial part will show you how to sew the StarQuilt block.

Monday 18 July 2016

Cuties

These Little Cuties have grown up a lot.

9 Little Bunnies were born on the 2nd of June. One died as new born. Two more we lost because of a storm when they were still staying in their nest; no older than 1 week.

There rest six  of nine kits are fine and grow up fast. There are three girls and three boys. They have Finnish names and in translated they'd mean something following: Silver Arrow, Sam, Middle Tortoise (= the boys) and Little Bang, Drama Queen and Tulip Ear (= the girls)

When the kits were 6 weeks and 1 day old I took my Continental Giant rabbit Sandy away with 5 kits and kept Tulip Ear with my angora rabbits. Sandy and the kits move into another fence to grow up more. Tulip Ear is doing so fine with the tender care of my gentle angora rabbits.

Sunday 17 July 2016

DenmarkDream (part4)

The Viking Ship Museum locates in Roskilde. The indoor exhibition is quite fast seen. One hour is enough for that. The point is to go there on a beautiful day and spend time on the outdoor area where you can explore interactive boatyard.

If you are going by foot from Roskilde railway station's direction to The Viking Ship Museum don't get confused despite you don't have a map. It is signed and the walk leads through  path passing local park. The signs are not very close to each others, just keep on walking downhills until another sign is placed. When you are coming up from the museum good choice is to walk through the park.

We met Roskilde more silent and smaller than Copenhagen. Someday it would be nice to stay there longer.

Roskilde Cathedral is on the world heritage list. It locates on the way down to The Viking Ship Museum to where the road leads between the cathedral and these yellow houses.


Related Posts Plugin for WordPress, Blogger...